

Right. Lets get down to business. Candy! Decadent, sweet and oh so naughty candy! I live for the euphoric sugar rush and love how it conjures up memories of a saccharine childhood (and the many painful cavities that went with it). Back then, sugar was my fuel. Lord help anybody who'd stand between me and a bag of Skittles. And yes, when it came to the rainbow colour of Skittles, I was a divide and conquer type of girl - first the purple, then the green, then red, orange and finally, the best flavour of all - yellow lemon. But I digress.

I laugh now at how I use to eat a Crunchie Bar; by shaving the chocolate off with my teeth before slowly savouring the sweet honeycomb underneath. I remember all the kitkats and lollipops that I consumed ad nauseum while reading my favourite Willy Wonka and the Chocolate Factory over and over again (and of course I dreamt of owing my own candy shop). And oh! Clinkers! Eclairs! Fantales! Jellybeans! Redskins! There's no denying it; I'm the candy girl through and through and I've always wanted to make my own. Time to live up to my (blog) name, I think!

It wasn't too long ago that I would seize up in terror at the mere thought of melting sugar. Oh the cursing at mischievous sugar crystals, the wayward attempts at spun toffee and freakin' bloody caramel! That was one tempestuous mistress that I couldn't tame until recently and I have the battlescars to prove it. Things have come a long way since then and now I am armed and ready with three sugar thermometers and way more experience (again, I reiterate, the battlescars. Ouch at the memories!). Sugar, don't mess with this bitch now!

I could give you some awesome, intricate display of sugar art genius but nah, I wanted to start off nice and easy (ha!). I can't think of a better trio to start with though - peanut brittle, honeycomb and chewy caramels - all classics and never in danger of going out of style. If you're a beginner like me, then these are perfect to kick things off because they turned out to be quite easy to make.

The biggest lesson I learned was to trust my thermometer. So many times I thought mine were broken because they would rise steadily then stay put at the same temperature for ages (cue yells of "bloody cheap *@^%!"). Don't panic like I did because it doesn't matter if it takes 5 minutes, 30 minutes, 2 hours, or if it looks like the temperature is doing funny things on its way up, if it needs to get up to a certain degree, you keep simmering until it gets there. And you know what? It eventually will.

The peanut brittle is straight forward so I don't think I need to share any tips (other than don't burn it!). The chewy caramels here are lightly salted and dipped in chocolate and reminded me of my beloved Pascall Eclairs or soft Werther Originals. I used a mini cupcake tin as molds then realised what a crappy idea that was when I found myself jamming a knife at the sides to pop them out. Which explains their none-too-graceful looks. I also had to dissect them so they could fit into the pretty little jars in the photo - hehe smart one Candygirl! Flexible silicone molds are definitely the way to go or better yet, you could just set it in a slab and cut into squares with a hot, oiled knife.
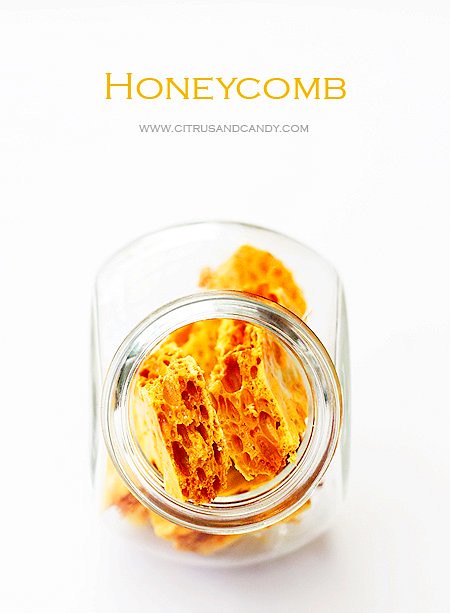
This honeycomb recipe was the best one I tried so far. Mine set with good sized bubbles that yielded the most lightest and crispest texture without the teeth-breaking stickiness. But make sure to use fresh bicarb soda for maximum foaming power and don't whisk it too hard or too long or you'll just deflate it into a sticky mess (there are so many things that sounded wrong in that sentence).

These all store fine in airtight containers for a few days at room temperature but if its hot and humid in your neck of the woods, stick it in the fridge preferably with those dessicant satchels to absorb humidity. I love gorging on them on their own but in the case of honeycomb, they are awesome crushed up and eaten with ice cream. This, my friends, is why dentists and I could never be friends... *sticks a caramel in her mouth*
Peanut Brittle
85g caster sugar
1 Tbl liquid glucose
125g salted peanuts, roasted in the oven (if using unsalted, add in a scant 1/4 tsp of salt)
25g unsalted butter, softened
pinch of bicarbonate of soda
Method
Line a baking tray with silicone mat or baking paper.
In a heavy based saucepan over low heat, add the sugar and glucose syrup and stir with silicone/rubber spatula until sugar has dissolved.
Increase heat to medium and cook until golden in colour and in the brittle stage (around 150°C). Remove from heat and add the butter, bicarb soda and peanuts and quickly mix until combined.
Pour onto prepared baking tray, quickly spread into an even layer and leave to set. Break into pieces to serve. Alternatively you could place a sheet of baking paper over the top and use a rolling pin to flatten. When it's nearly set, use a hot, oiled knife to score into segments or strips. Snap into pieces.
Print this recipe!

Honeycomb (aka Cinder Toffee and Sponge Candy)
80ml honey (can be replaced with golden syrup)
20ml water
220g white sugar
2 tsps bicarbonate of soda
Method
Grease and line a baking tin with baking paper.
In a large saucepan, heat the honey, water and sugar together, bring to a boil then simmer on low heat for 5-10 minutes until it reaches brittle stage and a golden colour (150°C). Watch that it doesn't burn.
Remove pot from heat, add the bicarb soda and quickly whisk in for a few seconds. Pour immediately into the cake tin. Leave to set then break into bite size chunks. If it's a humid day you might have to finish setting it in the fridge.
Print this recipe!
Adapted from Allrecipes.com.au

Salted Caramel Chews
250g white sugar
250ml pouring cream (35% fat content) - double cream or thickened cream can also be used
60g glucose syrup / liquid glucose
30g butter
1-2 tsps sea salt (to taste)
150g dark chocolate (66% cocoa solids), coarsely chopped
Method
Place sugar, cream, glucose, butter and sea salt in a heavy-based pan and stir over low heat until sugar dissolves. Increase heat to medium and boil until mixture reaches 118°C on a thermometer. It'll bubble up and simmer quite vigorously so watch that it doesn't boil over. Divide amongst 24 mini muffin/cupcake molds (flexible silicone pans are best) and leave to set for a couple of hours. Alternatively, you could pour it into a small well greased cake pan and when it has set, use a hot, oiled knife to cut it up into squares.
Melt chocolate in a heatproof bowl over a saucepan of simmering water, spoon over each caramel in the molds and stand until set. If you're making a slab and cutting out squares, use your hands to dip the caramel in (quarter of the way through) and leave on a baking paper lined tray to set, chocolate side up. Remove from molds (if using) and store on a single layer in a baking paper-lined airtight container for up to 5 days.
Print this recipe!
Adapted from Gourmet Traveller


